How to Add a Dynamic Search Box and Filters for Your Shopify Store


Up to a third of e-commerce customers will use the site’s search bar to navigate. A relevant and accurate search can help your customers find and discover products without friction, and increase the chance that they will complete a purchase. A poor-performing or inaccurate search, on the other hand, can have the opposite effect—turning customers away from your store and affecting your bottom line.
With search being that critical to conversion and success, you would think that Shopify’s default search would be best in class. Unfortunately, it’s quite barebones by design, returning only exact results based on the queries typed in the search bar.
Fortunately, this is where Sajari shines. Sajari can improve your search and the overall navigation of your website by adding in options and features that simply don’t exist in the default Shopify search.
Not only does it enable you to provide high-quality results, but Sajari also has a robust series of features and capabilities that allow you to build best-in-class customer navigation with detailed analytics, built-in marketing, and advanced personalization capabilities.
In this article, I’ll go over two different methods you can use to integrate the full set of Sajari functionality into a Shopify store, and start enjoying all the benefits that advanced search brings to your e-commerce website.
Method 1: Using the Sajari UI Builder
Using the UI builder is the easiest way to get started, and will allow you to integrate advanced search to both your collection navigation and search results. This option is perfect for smaller shops and less technically savvy users, as it quickly replaces the search and catalog experiences with Sajari’s superior UI. It’s also extremely easy to tweak in terms of branding, style, and layout.
Your first step is to get the application installed in your Shopify Store.
After the installation and the initial indexing of your store is complete, you will be redirected to the Sajari dashboard. From this dashboard, you can customize the search UI and start the integration process by clicking on the Shopify link at the bottom of the left-hand navigation bar.
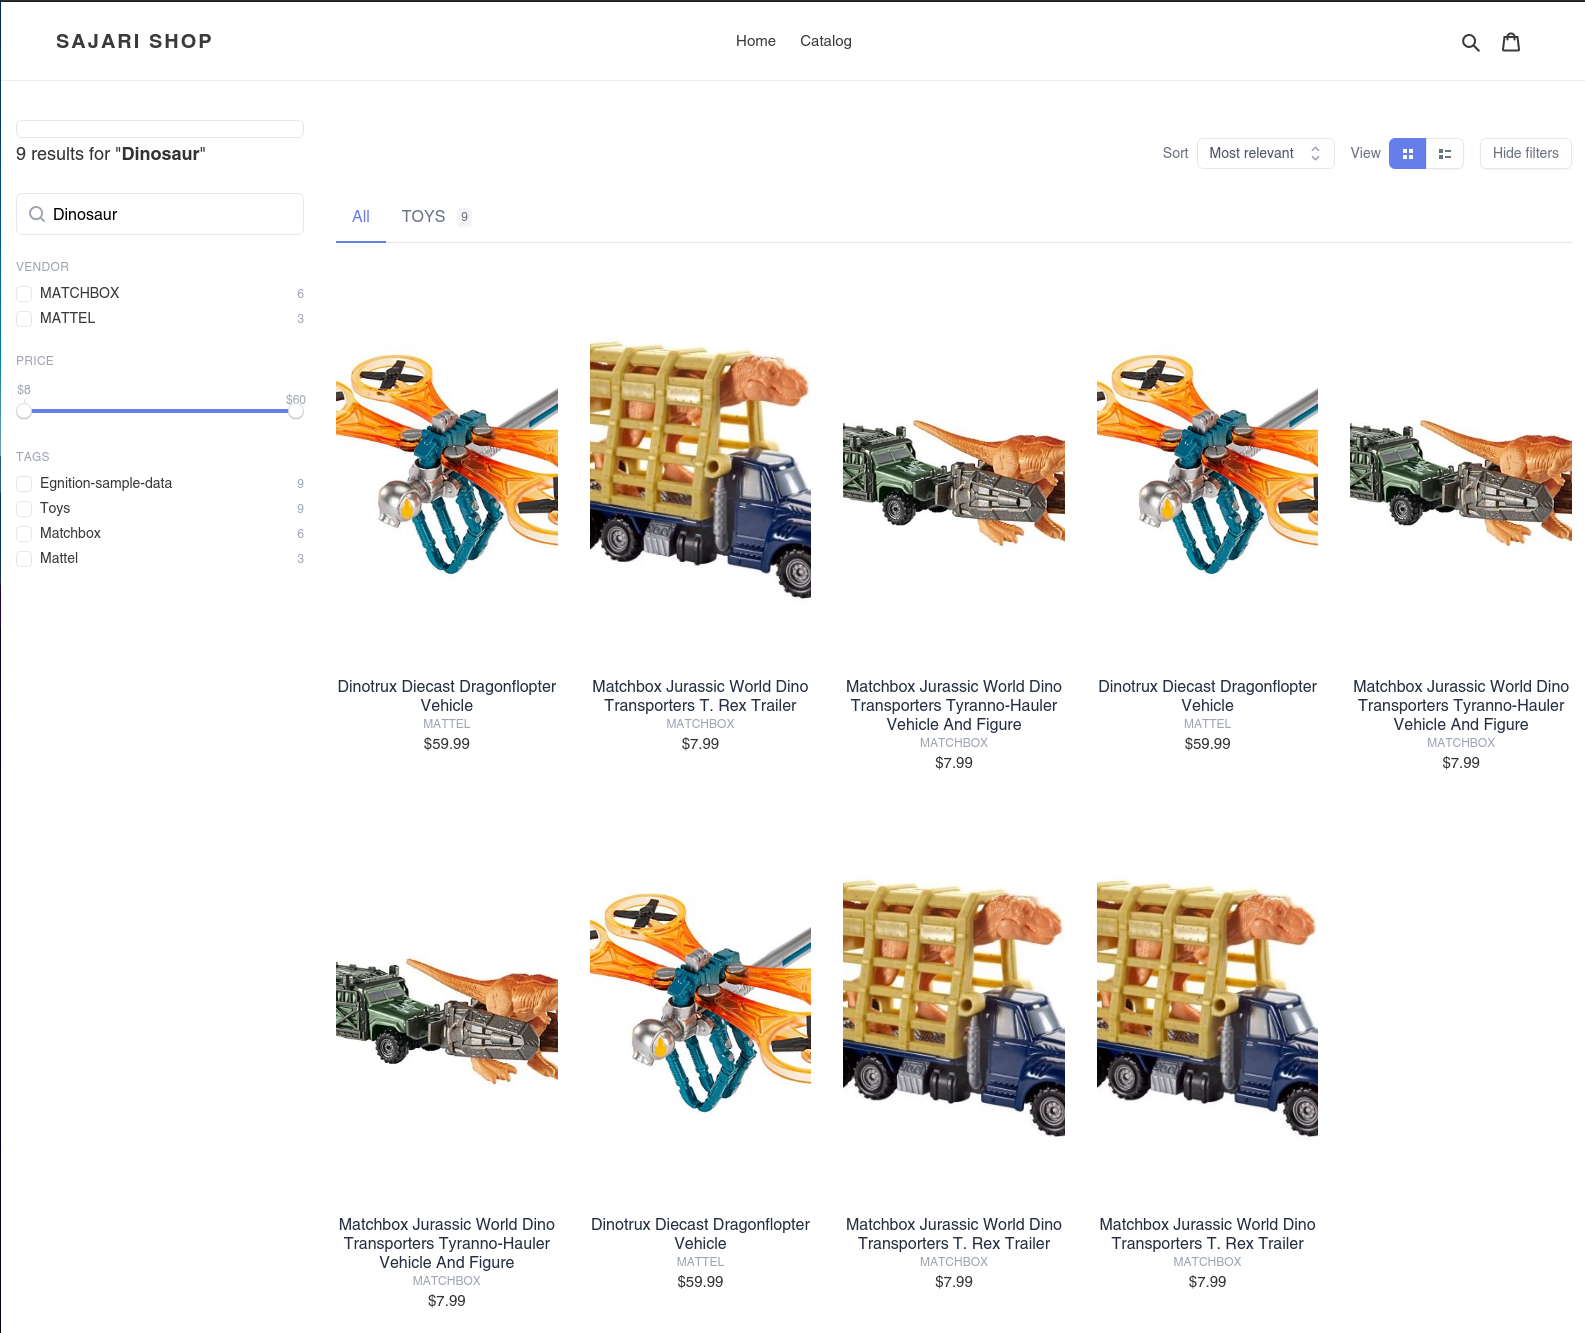
This will open a new screen where you can customize and preview the search results before actually integrating them:
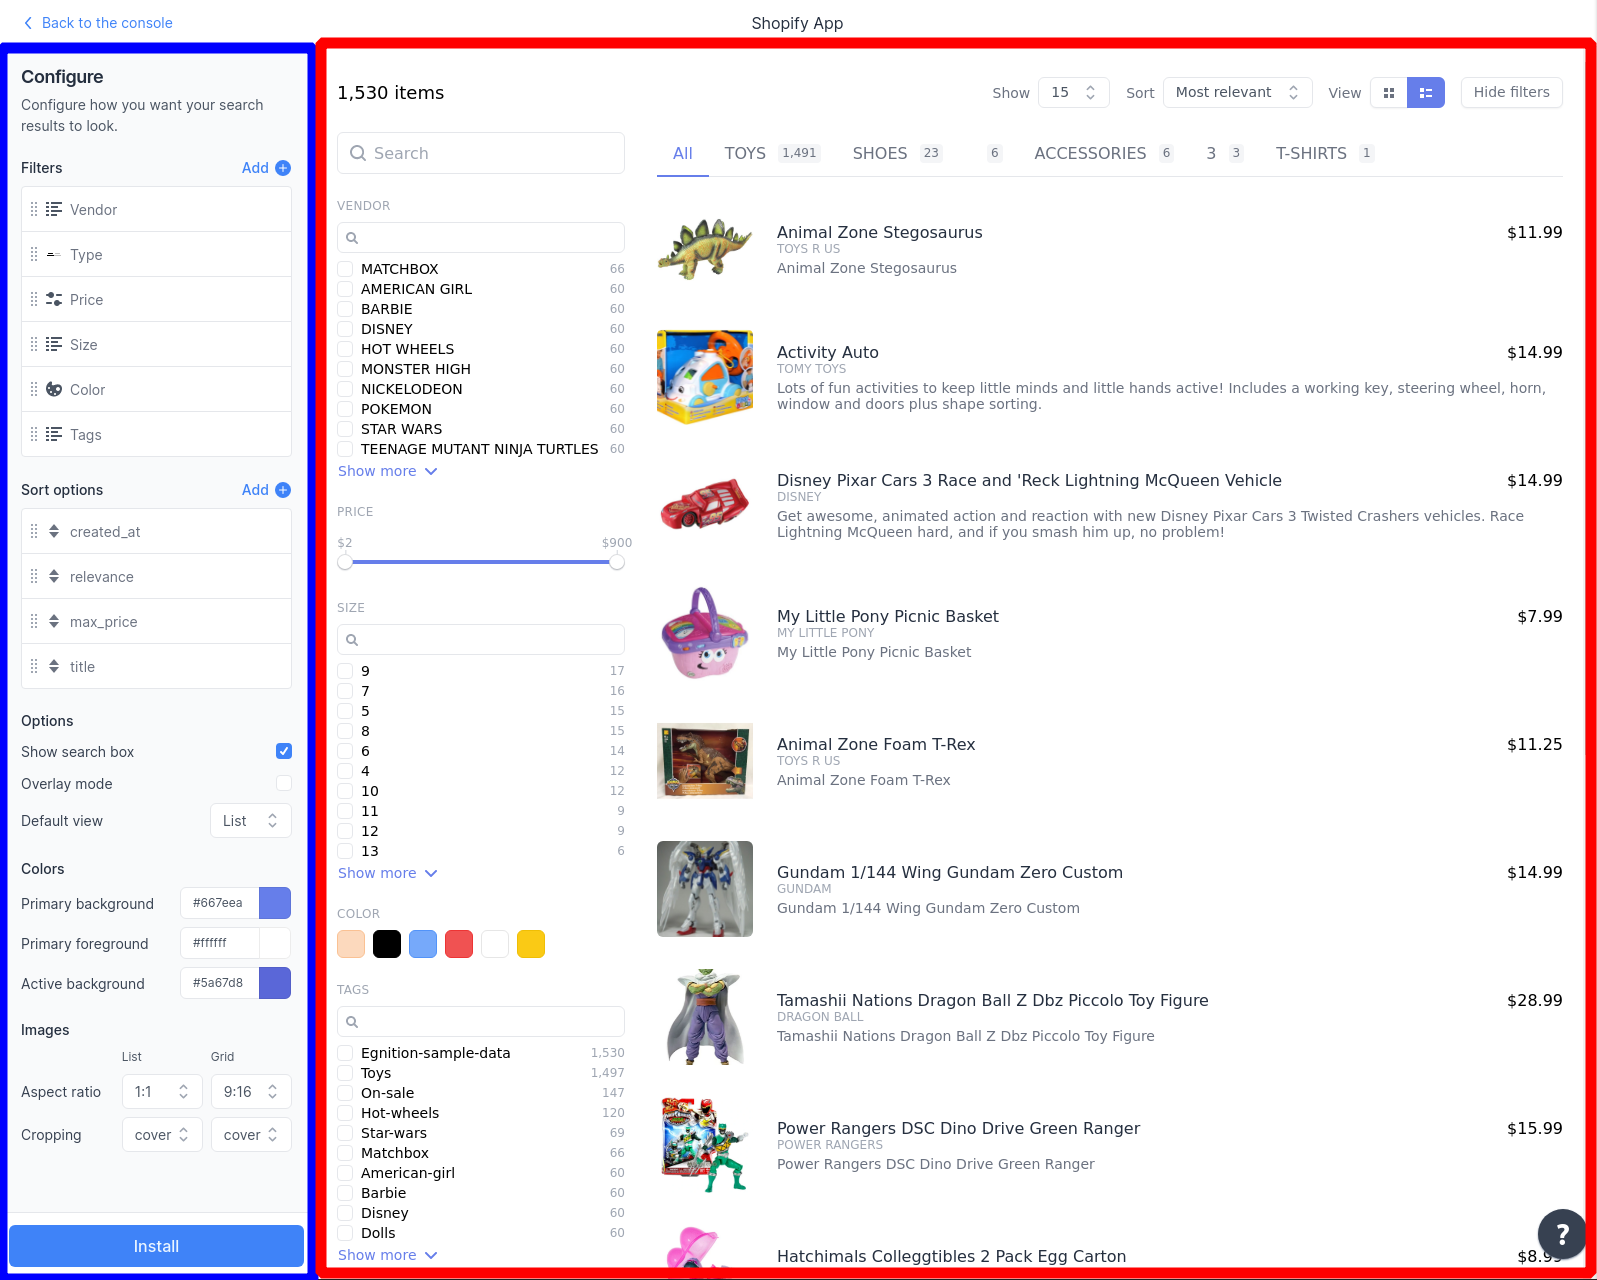
The left sidebar (highlighted in blue) will allow you to customize the search results (highlighted in red) in the following ways:
- Drag and drop filters and facets
- Add and remove filters and facets
- Customize search options
- Change default colors to match the store branding
Once you’re satisfied with how your search preview looks, you can go ahead and embed your search in your Shopify store. This will require you to edit your selected theme and copy some code. Here’s how:
1. Navigate to the Themes Section in Shopify
On the Shopify admin panel, click the Themes link under Online Store.
2. Duplicate Your Current Theme
From the Actions dropdown in your current theme, select Duplicate to create a copy of your current theme.
3. Add New Sections to the Shopify Theme
The integration requires you to create a few custom sections inside the theme:
- sajari-global.liquid, which injects the required JavaScript code from Sajari.
- sajari-search.liquid, which inserts the search form and results into your page with settings for filters and more.
- sajari-collections.liquid, which is used for replacing Shopify default collection navigation with Sajari’s enhanced view.
Note: The Sajari UI builder will provide the code snippets that will go in these files once you click Install.
4. Modify the Existing Theme Sections
Now that you have added your custom Sajari liquid files, go ahead and update the respective Shopify theme template files. As with the previous step, the code snippets will be automatically provided through the Sajari UI builder once you click Install.
- Update theme.liquid to load the sajari-global section.
- Replace search.liquid contents with the sajari-search section.
- Replace collections.liquid with the sajari-collections section.
5. Preview and Publish
Finally, you can preview the changes to your theme and make sure that both your search and your catalog results are working as expected. In order to preview the changes to your Shopify team, follow these steps:
- Make sure that all the changes to the .liquid files have been saved.
- At the top right of the theme’s edit screen, select Preview.
- Shopify will open a new tab with the changes loaded.
- Make sure the Sajari search and collection navigation is visible and working as expected.

Method 2: Using the Sajari React Library
Although using the Sajari UI builder is extremely fast and easy to get started, it might not be the right choice for larger Shopify stores or complex implementations. Another option is to directly use Sajari’s React library to create a customized search experience.
While Sajari’s UI builder gives you snippets of code ready to copy and paste, Sajari’s React library gives you the building blocks to put together a full experience yourself. This kind of integration method fits well in the following scenarios:
- Larger stores that need finer control over customization and behavior of search.
- Headless storefronts and SPAs that are not using Shopify as their main storefront.
The Sajari React SDK is divided into three main packages:
- Components: Core components that allow you to interface with any backend.
- Hooks: Allow you to build a search interface using any component library.
- Search UI: Easy-to-use search components to quickly build a beautiful search interface.
This article will focus on Search UI, as it gives the most out of the box. Keep in mind that using ReactJS components does require significant programming knowledge and understanding of React and headless development.
Integrating React.js with Shopify liquid templates or creating a fully headless storefront is a bit outside the scope of this article, but farther down in the Reference section, you can find links to a few recommended tutorials for each approach.
There are two main concepts that you need to get familiar with when working with the Sajari Search UI SDK: the classes and the components.
The Classes
Classes are used to build queries against the Sajari API and parse the results so they can be rendered by your react components. In this example, you’ll use:
- FieldDictionary: The FieldDictionary class is used to map fields in your data to the required fields to display in the UI.
- FilterBuilder: The FilterBuilder class is used to construct filters for use with the relevant SearchProvider.
- Variables: The Variables class is a simple key to value pair object used for every search request.
- Pipeline: The Pipeline class is required to configure which pipeline to use for search queries and must be passed to the SearchProvider.
- Config: The Config type defines a mapping between key/value pair params to be sent with each and every request.
- SearchProvider: The SearchProvider class should be used as a wrapper for the entire application to provide a way to share application state between components, for example, the current query, active filters, or the search response.
The Components
The Search UI SDK provides a few predefined components you can use to render search results. The following are a few of the most common ones you can use to build your main app:
- Input: Used to capture query input via a text field. It can also provide suggestions, typeahead, and instant search modes.
- Sorting: Used to capture user input on how to sort search results.
- ResultsPerPage: Used to capture user input for how many results are displayed per page.
- ViewType: Used to allow toggling between viewing modes of results.
- Filter: Used to render filter options allowing refining of search results.
- Results: Used to display results response from a search query.
- Pagination: Used for paging through paged result sets.
Putting It All Together
Now that you understand all the components and classes you’ll be using, it’s time to put them together in a way that integrates Sajari into your Shopify search.
1. Install
Install the package with yarn inside your React application:
2. Skeleton
Here’s a rough structure of what your application should look like. You can copy and edit it as needed:
3. Pipeline
Pipelines are the core of how Sajari enables data indexing and querying. An excellent way to think about pipelines is as the dataset that you’ll be using for your queries.
For the purpose of this example, you’ll be using a demo query pipeline with some BestBuy products, and you’ll display the best sellers from the toys category.
4. Fields
The FieldDictionary is really useful when you need to map fields in your dataset to required fields in the UI.
In the snippet above, you’re taking the product name field and mapping it to the title, and you’re mapping the subtitle field to either the product brand or a category.
5. Variables
Next, you need to define the set of variables that will be passed to the pipeline. The Variables class is a simple key-value pair object used for every search request. It includes critical data such as query, results per page, and current page.
To keep this simple, ask to show six products per page and predefine the query. In this case, you only want to show products that match toys.
6. RecommendedProducts
Your next step will be to define how you want to render your search results with the following snippets:
You’re using two components: Results, which takes care of parsing the search results from the search provider; and Pagination, giving you the ability to paginate if there are more than six results that match your query.
Additionally, there’s some boilerplate HTML to provide a basic layout.
7. SearchProvider
Finally, the last thing you need to do is wrap your search block inside the SearchProvider component. This search provider is essentially a wrapper for the entire application. It gives a way to share application state across all the individual components, like Results, Pagination, Filters, and the current query.
As you can see, you’re passing the constants that you declared previously (pipeline, fields, and variables).
8. The Final Code
Putting everything together, here is how your index file should look:

As you can see, the Search UI SDK setup takes a little bit more work and some technical know-how. The reward, though, is extended flexibility and total control over the search experience, making it an ideal solution for custom applications or use cases where you might need seamless integration with an existing application.
Conclusion
Whether your store has a few hundred or a few thousand products, faster and more accessible product discoverability is essential to improve conversion rates. With Sajari, you have a robust set of tools and capabilities you can use to build best-in-class search experience and enhance collection browsing and product promotion.
Now you know how to integrate it into your store using two different methods, but if you’d like to learn about even more advanced features, please check out the links below.
References
- How to Build a Headless Shopify Storefront
- The Definitve Guide to the Difference Between Filters and Facets
- How to add React.js to a Shopify Theme
About the author
Guest contributor Allan MacGregor is a software engineer and entrepreneur based in Toronto, with experience in building projects and developing innovative solutions.